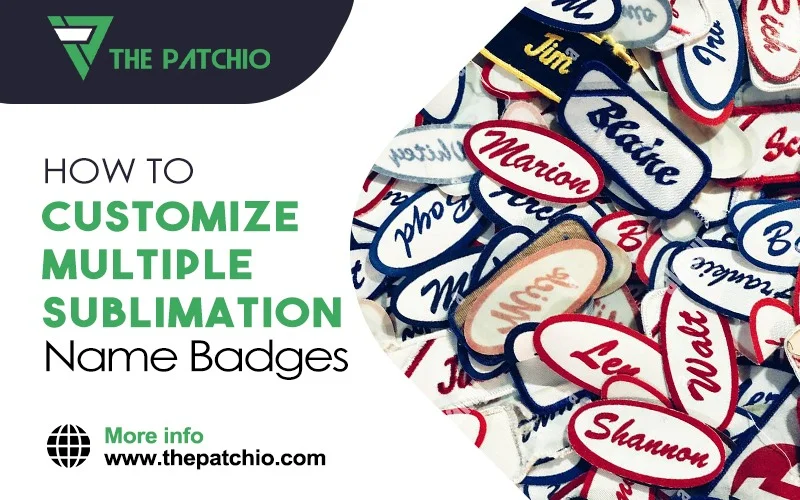
Sublimation patches can be a very chic way for you to carry a trademark or your brand name with you anywhere and effortlessly enough that they can be pinned to any outfit you want or like. Customizing them according to your liking or your client’s is very possible with the process that is involved, however, it is vital to understand that the process is a tad bit complicated but not difficult.
However, if you carefully learn all the steps and their order, it is fairly easy to follow through and create not just one but multiple customized sublimated name badges.
Use a Relevant Software
You will first need to have access to relevant software that will help you get the necessary templates for kick-starting the process. Templates can be found for sublimated badges on HeatPressnation.com and illustration software like Adobe Illustrator. Begin with importing the background to your illustrator and copy it over to the document that is the desired size of your customized sublimation badge.

Next on, you can scale it down to the bleed layer of your badges and then proceed to use that layer as a clipping mask. Now prepare for your next step that takes you closer to your customized multiple sublimation name badges. Once you have done this, it lays the foundation for you to be able to add and group down other elements to the badges. Do this as per your customization layers right under the clipping mask.
However, using an illustrator you should remember that even though the design of the customized sublimated name badge is under the bleed layer. It is important to have this non-destructive way of illustration so the safety of your real template and imprint.
Further on, change the opacity of the template and reduce it down to 50% in order to be able to use that as a reference for the next ones since you are in the process of making not one but multiple sublimated badges. This also helps you to fit your text and elements with more convenience, until you are able to later delete them once you can see your design on the document. Having your designs extended to the bleed layer also provides you with space to properly align all the badges once you are onto transferring them together.
Once you are done with this, the next step for you is to make sure that your text is aligned exactly in the center of the badge design. After you have done that, you can continue to copy and paste multiple identical badges designs out of the one badge onto the rest of the paper.
Important Hack
If you happen to use a sawgrass printer, you will need to make sure that you are keeping a quarter inch print margin to minimize any chance of a misprint. On a sawgrass printer, you will also need to change the substrate to the ‘polyester’ as your paper option.
Then move to the color option and change your mode to photographic or vivid to lock and achieve the best and most crisp details of your design. And you are now able to move to the printing part of your task.
Click Print and once the transfer has been printed and you have your print you are now ready to move to the conclusive part of your job of making custom patches or badges; whatever you want!
Applying the Prints on to Your Badges/Patches
The machine should be set to 75 seconds at 400 degrees Fahrenheit on the heat, and medium pressure to achieve a proper and desired texture of your custom sublimated patches. Another further consideration that has to be made is that an additional 5 seconds have to be added for every badge that is being prepared since you are making multiple badges and not one.
For instance, 10 badges will equate to 50 additional seconds. Once you have set the temperature of the machine, cover the lower platen of the machine with a parchment paper. After you are done, your prints are ready to be placed on the top of the parchment paper. The next step is placing the name badges on the prints face downwards.
Make sure you are placing the badges on each image downwards. Your next step should be attaching the heat tape onto the badges. After that, turn the face of the paper downwards on the heat machine and cover them with a second parchment paper sheet.
Now you are ready to press!
What to Do, After Pressing?
Once your machine is done with its work, take away the press and allow the badges to cool down for a few minutes. Then proceed to quickly peel off every customized sublimation name badge from the transfer. Once you’re done laying them out one by one your name badges have now been sublimated. Post this procedure, you will now need to attach a magnet backing behind every customized sublimated name badge. This step allows you to eliminate the involvement of a needle to attach your name badge on any kind of fabric or garment surfaces of your choice
Final Words
Customizing sublimation badges is a technical yet artsy way of work. Even though it seems difficult to do it, the process is fairly easy once you understand the details of the process and in order of the steps. However, when you are doing it, remember to be careful and also along with it understand the complexities. The machine is a crucial part of making multiple sublimation name badges so it is vital to be able to handle it correctly.
Additionally, make sure to be capable of handling the adobe illustrator with complete expertise especially when you are making multiples. This is because it has to be done right or the rest of the procedure will have to bear the loss of the error that was made at the start. Make sure to do this process diligently to get perfection.
Good luck making your customized sublimation name badges!