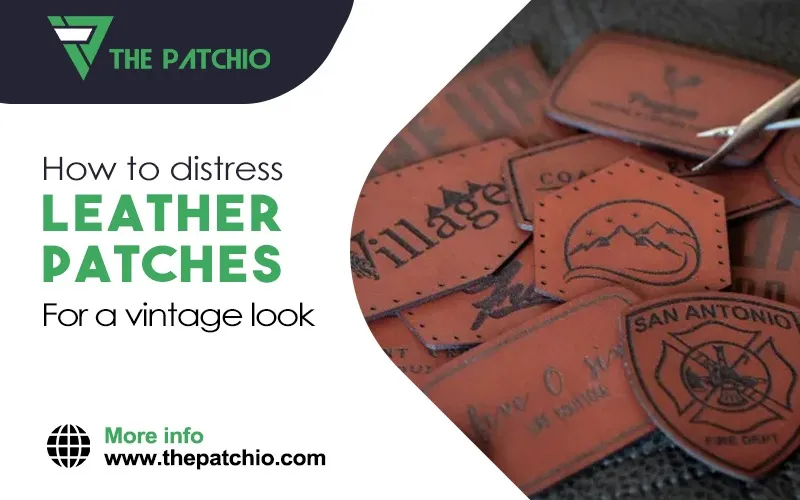
Are your basic leather patches becoming traditional and boring for you? Want to give them a retro appearance? The remedy is distressing. It's a simple and enjoyable method to give your leather patches personality.
The distressed fashion craze has been here again in recent years. Moreover, the biggest models, stars, and influencers are sporting torn clothes, i.e., ripped jeans, on a regular basis.
In order to follow the current fashion trend, consumers are really spending hundreds of dollars on pre-distressed apparel.
There is no blame on you if you can't justify spending your hard-earned cash on clothing that is torn and damaged before you buy it. In this blog article, we will discuss How to distress leather patches easily and why distressing your leather is valuable.
Why Distressing Your Leather Is Worth It?
Do you want to know why you are making efforts to distress your leather? It's crucial to first determine! Before gathering your supplies and beginning to work on your leather apparel item, you need to know the importance of distressing.
Distressed leather is truly a trend that has been to the test of time and will continue to do so for the foreseeable future, not like other craze fashion items such as shirts and bottoms with a million enormous holes in them.
Particularly, leather patches with distressing textures have been evolving into a timeless fashion trend that many generations are embracing. Distressed leather also has a story or explanation to tell, and whichever outfit you combine it with will look better!
This is due to its vintage appeal and timeless fashion style.
Here's a quick and easy way to give your leather patches a worn-in appearance without spending any time on them! Let's see how to distress leather patches in a short time.
Need More Information?
We will return back to you within 8-12 hours with a custom product quote.
How To Distress Leather Patches Items?
First of all, you need to have all the right tools if you want to speed up the distressing of your leather patches. Here is everything you will need on hand to successfully weather leather:
- A bottle of 90% rubbing alcohol
- Sandpaper
- One heavy bristled brush
- Rubber gloves
- Shoe wax
- Shoe polish
Step 1: Apply Rubbing Alcohol
Here are some of the dont's of creating custom embroidered patches you must keep in mind for the best result.
1. Don't Overlook the Details
Applying rubbing alcohol to your leather is the initial step to completing the distressing session. Also, this method of distressing has been around for a long time.
You should pour 90% rubbing alcohol into a spray bottle and use it to sparingly wet the leather. The leather will become moist and soft by doing this. And it will significantly increase its weakness in distressing procedures.
Be careful not to completely saturate your leather patch; it should only feel damp to the touch.
Step 2: Rough Your Leather Up
Now, it's the right time for the enjoyable part! It is to beat up your leather patches. It beats your leather after checking if it is completely moist or not in the rubbing alcohol.
Crumple, fold, and knead your leather item to release any blockage of rage you might be feeling. This will give it the creases and lines of wear and tear that are distinctive to leather that has seen use.
Step 3: Scratch the Leather With Sandpaper
Once the wrinkle-like lines start to appear, you can then grab some sandpaper out and use it on the edges, bottoms, seams, corners, etc.
These areas of the leather patches generally wear out first. Your leather will look considerably more aged as a result.
Step 4: Refresh Your Leather. Apply A Bristle Brush to The Area
By taking a strong bristle brush from your toolbox, you can use it in the same way you would use sandpaper. It will give your leather an even more worn-out appearance.
Moreover, to leave lasting scuffs and scars on the patch, you must move the brush in upward and downward directions. The extra step seems important because, here, you would put an emphasis on the wear and tear in vulnerable areas.
Step 5: Use Shoe Wax to Seal Your Creations
Use some shoe wax to protect the surface of the leather patch. Once it appears to have suitable distress and you see dryness of the rubbing alcohol. Apply the shoe wax over the outer layer of the leather with a cloth or toothbrush to provide further protection.
Step 6: Kick Up Some Dust
For the final step, you can add a dusty or distressing appearance by taking your patch outside and tossing it into the dirt. You need to toss in the dry dirt only!
Don't put it in the mud or sand; just kick some dust over it. When you've got the look and feel you want, just brush off the excess.
How To Properly Attach Leather Patches to Clothing or Accessories?
You finally have distressed your leather patch, and now you might be looking for ways to properly attach it to your favorite jacket. When you are not sure about which method to choose to sew your patch, glue it or iron it on.
Then, the best you could do is by mixing two techniques. You could fix the patch at the position where you want by ironing it. Also, you can then sew it to your hat or t-shirt for longevity.
This is how you can be 100% sure that your Custom Patches Products do not fall. You can use these methods with Custom Patches Online.
The Final Word
Use these quick and easy instructions to analyze how to distress leather patches and give them a distinctive appearance that will make you stand out from the crowd. Say goodbye to boring leather patches and hello to ones that are rustic and fashionable!
You can Buy Custom Leather Patches from ThePatchio today!
Apply your favorite patches on hats with leather for t-shirts or jackets. We hope you find this article helpful, and in case of any assistance, you can always contact ThePatchio.
Do write us back if you try any of the above methods above.